Sunday, December 11, 2011

FOOD

The basic ssurvival food has traditionally been BREADS

GAULLETTE

every morning of my life, until grown, and every morning of my
fathers life we had the same thing for breakfast. GAULETTE and bacon
strips. as did everyone in the family before now.
no one in the family knew where the tradition came from... until i
got online. it turns out GAULETTE was the basic staple of the
FRENCH NAVY. since i am a direct descendant of the founder of canada
who in turn was a canadian voyageur ( thats the guys who paddled the
giant canoes across canada in the heyday of the fur trade) that was,
as most were, french naval veterans it became obvious where the
tradition came from. the voyageurs only traveled with the basics.
they lived from GAULETTE and foraged game, berries, honey etc.
GAULETTE ( pronounced gaw-let ) is a flatbread that is cooked in a
fry pan. it was easy to make on a flat rock over the fire. we still
eat it ocassionally for nostalgia. here is how to make/eat it.

GAULETTE
in a mixing bowl dry mix
1/2 cup whole wheat
1/2 cup white flour
1/2 tsp salt
1 1/2 tsp baking powder
when mixed
add 1/2 cup milk ( or water but milk is better)
stirring as added until dough consistancy. stir until dough BREAKS
AWAY from the bowl.
remove dough glob and powder it with flour to non-stick.

pre-heat cast iron skillet.
lubricate with 1 tbsp butter
place dough ball in skillet and FLATTEN it to less than an inch
thick.
brown BOTH SIDES well mashing it down as it browns till done.

while the original GAULETTE was made with water and bacon fat for
the skillet using milk and butter makes for a much tastier result.

it is served by placing the big round bread in the center of the
table. diners break off pieces and DIP in the syrup of choice.
honey, maple syrup, black strap molasses etc.

GAULETTE the old time french navy survival bread.

HARDTACK

 The traditional survival biscuit was HARDTACK.

Make Your Own union hardtack
Here are recipes that will help you eat like a Union or Confederate soldier.
what to do
1. Mix all ingredients together. Make sure
you add enough flour so that the dough
is no longer sticky, but be careful not to make
it too dry. Knead the dough a few times.
During the war, hardtack was about half
an inch thick, so when you’re rolling the
dough, aim for this thickness. It is easiest to
roll the dough directly on an ungreased cookie sheet. Bake at 350 degrees
for about 30 minutes.
2. Remove the dough from the oven, cut the large square into
smaller three-by-three-inch squares. Poke 16 evenly spaced
holes in each square. Flip, return to the oven, and bake for
another 30 minutes. Turn the oven off, and allow the hardtack to cool in the
oven with the door closed. Allow to completely cool, and then enjoy!
Variation: Soldiers often soaked their hardtack in leftover water
from boiling their meat. This softened the hardtack, and
also gave it some flavor. They would then fry the softened
hardtack in pork grease. The end result tasted something
like a crouton and was called “skillygallee.”
Let’s Get Started
what you’ll need
H 2 cups of flour
H Z\x to C\v cup water
H salt (5–6 pinches)
H bowl
H rolling pin
H cookie sheet

Firestarters

ya gotta have fire. if you're gonna survive. theres numerous was to make it from improvised indigenious methods. everyone has thier favorite way. there are many more modern ways to do it. all you need is a SPARK eh? KEEP those "empty" disposable lighters. i mean they're just free sparklights eh? scatter them around. drop any a pinch of TINDER or better yet gunpowder from a .22 shell dropped in the burners hole will give a sure FIRE every time. scatter .22's throughout your kit. a few grains of powder aids any firestarting effort. i've tried about all ways. the most impressive was the BLAST MATCH device. i wore one around my neck for a couple years. thats how impressed i was. i have them in all my vehicles gloveboxs, my tool boxes and my packs and most of my coats. i lucked out in 1999 and got a case @$5ea. in the preY2K sales. i try to never be very far from one. every serious kit needs one.

With the ability to start a fire being a primary survival necessity, fire starter is an important asset. While a lighter, or even matches in many cases, can be used  when push comes to shove what you need is a reliable artificial flint style fire starter as your ultimate back-up. For a long time the Four Seasons Survival "Spark-Lite" (left in photo) was the only such product available (Retail: $6 to $7). Recently, Ultimate Survival Technologies (FKA Survival Inc.) came out with their Ultimate Survival brand "BlastMatch" (right in photo) one-hand fire starter (Retail: $20). We'll examine the two products and compare their advantages and disadvantages. With the exception that they both produce sparks with which to start a fire, there are few other similarities. They are a study in contrast and differing philosophies.
One thing they do both have in common is that they are both used by the U.S. military. They also both come with a limited lifetime guarantee from companies that, in our experience, are committed to customer service.

Spark-Lite

The Spark-Lite device, itself, is very small and light, 2 1/4 x 9/32 x 9/32 inches (58 x 7 x 7 mm), 0.02 oz. (5 gr.). As can be seen in the photo, it is not much bigger than a few small wooden matches bundled together, a design goal so that it could fit into a standard waterproof G.I. (or similar sized) match container, if desired. The serrated wheel at the top rubs on a small flint that is encased in the plastic body (available in blaze orange or OD). The flint is spring loaded to maintain contact with the wheel. In concept it is nothing more sophisticated that the sparking mechanism used in cigarette lighters for years, just repackaged into a convenient and durable form factor, and making a lot more sparks.
Despite the small size, the manufacturer claims upwards of 1,000 lights from the unit. In our experience, we have used one Spark-Lite to light at least a hundred fires and demonstrations over the past few years, so from a survival perspective, you're not going to run out of spark.
The sparks generated are not a huge shower like you might get from a large artificial flint and steel, though certainly up to the task provided good tinder is available. That brings us to the second part of the Spark-Lite, the Spark-Lite "Fire-Tabs." The Spark-Lite comes packaged in a flip-top plastic container (available in blaze orange or OD) just a bit bigger than a small box of matches, 2 1/2 x 1 1/16 x 11/16 inches (64 x 42 x 18 mm). Inside are also included eight "Fire-Tab" tinders. Total weight for the complete kit is only 2/3 oz (19 gr.). This tinder, approximately 1 1/8 x 3/8 x 3/8 inches (30 x 10 x 10 mm), is fibrous bound cotton impregnated with a combination of beeswax, petroleum and silicone. It is waterproof and catches fire readily, burning with a moderate flame for an average of 2 minutes. The tinder can be sliced in half and will still be adequate for most fire starting requirements. It is also available separately in bagged packages of ten ($2.50).
For best results, illustrated in the enclosed instructions, you should pull it apart, using your fingers or by snaring it on a stick or rock or using your teeth, to expose the fine inner fibers, providing a less dense medium which aids in catching the sparks and in burning hotter. For packing in minimum space, such as in small personal pocket-size survival kits, the tinder can be compressed quite a bit, rolled or flattened, with only minor deterioration in effectiveness, though it requires a bit more care to fluff it up before use and it's difficult to get it quite as fluffed-up as if it had not been compressed.
Spark-Lite in actionAs can be seen in the animated GIF, operation is simple and obvious, hold the body with a couple fingers and stroke the sparking wheel with the thumb or index finger, whichever is easier. With heavy mittens on this can be somewhat difficult due to the small size of the Spark-Lite. Using the included tinder, we have never failed to light it on the first or second stroke. Results with natural or improvised tinder have been almost as good, though care must be taken that the tinder is fine enough in some cases. In years of using this tool we've never failed to get a fire going, no matter the weather or conditions.
If there is one thing we'd like to see, it would be some manner of lanyard attachment, both for the whole kit and the Spark-Lite itself. Never hurts to be able to secure something as important as your fire starter. You can always drill a hole in the case and the body of the fire starter if desired.
The detailed instructions provided in the case include illustrations depicting fluffing up the tinder and operation of the Spark-Lite, along with detailed text instructions. The instructions are easy to read and understand. A minimum of fire starting hints are provided. Printed only on one side, it's a shame they didn't take advantage of all the blank space on the other side to provide more fire starting hints.

BlastMatch

The BlastMatch is much larger and heavier than the Spark-Lite, 4 x 1 3/8 x 7/8 inches (102 x 34 x 22 mm), 2 3/4 oz. (78 gr). It long oval shaped molded plastic body incorporates a 2 1/2 inch (65 mm) long by 1/2 inch (13 mm) diameter rod of commercially prepared flint that is spring loaded. When the cap is released the spring forces the flint rod out, exposing 1 7/8 inches (48 mm) outside of the case. The cap is retained by side rails and pivots around to the "bottom" of the case where it is out of the way. The molded side catch for the cap incorporates a carbide scraper. The body includes a lanyard slot.
BlastMatch in operationOperation of the BlastMatch is straightforward. An instruction sheet is included inside the box within which it is packaged for sale, but there are no illustrations, the printing is so tiny you virtually need a magnifying glass to read it, and the sheet does not store in the device. Normal procedure is to hold the fire starter next to the tinder with the tip of the flint rod on a hard object such as a stone or piece of wood. While applying pressure to the side catch with your thumb, push down on the body, forcing the scraper inside the catch to scrape down the flint, producing an abundance of sparks, as seen in the animated GIF.
When we first tested the BlastMatch (the ones pictured in all these photos) we took note of a minor problem with early production units. Because there was no rod stop, it was natural to shove the body all the way down until it hit whatever you were pushing against. This occasionally ended up breaking the end piece of the catch and the cap would then no longer stay closed. While this had no adverse effect on its functioning as a fire starter, it would be annoying and could make storage somewhat of a problem afterwards.
Survival Inc. subsequently redesigned the body so that there is a stop to prevent the case from contacting the surface on the down stroke and they also beefed up the catch, just to make sure it would better withstand any abuse. These changes have solved the problems we encountered.
If there is no firm surface available to use, or if you need to light a fire from a greater distance, such as if using gasoline or similar highly flammable materials to start the fire, it is also possible to operate the device by holding the catch down with your thumb and forcing the flint up into the case with your index finger. While this works, it virtually always results in minor discomfort or burns from the sparks hitting the end of the index finger if protection, such as a glove, is not used. If both hands are available, you can always resort to using a knife edge on the flint as you would do with a conventional piece of commercial flint. The bulk and operating mode of the BlastMatch make it relatively easier to use while wearing heavy mittens.
The BlastMatch is aptly named and the massive shower of sparks makes this a very effective fire starter, no question about it. We had no problem lighting fires with a variety of natural and improvised tinder. We also tested the manufacturer's commercially prepared tinder which they market as "WetFire Fire Starting Tinder," sold in a box of ten ($6) This tinder was developed originally for use with the Strike Force fire starter which was also designed and produced by Survival Inc. and then marketed by Gerber for a while. In that design the rather bulky body of the fire starter had room to store a piece of the tinder. Not so the case with the BlastMatch, tinder must be carried separately.
The tinder, which is essentially the same material found in larger cubes sold as a fire starter for charcoal barbecue grills, is packaged in small clear lightweight molded plastic containers, 1 3/16 x 5/8 x 5/8 inches (32 x 15 x 15 mm), with a larger lip. The "top" is peeled off the lip to get at the tinder, though occasionally the whole plastic film encased piece comes out and the thin airtight protective casing must be ripped or cut open, not a big deal. This tinder deteriorates with exposure to air, so the airtight packaging is necessary and care must be taken when packing that it is not punctured.
The solid, waterproof tinder is most effective when at least a small amount is scraped or shaved into a small pile before lighting, though it will work fine if just roughed up a bit and will usually light right off even if not prepped at all, though sometimes it was hesitant to do so the first time. It catches fire readily, from any source, and burns with a high flame. A whole cube burns for approximately 4 minutes, about half of that with maximum output, the remainder at considerably reduced levels. If the whole cube is not required, usually the case, the rest will keep for 30-60 days exposed to the atmosphere when fresh, though this period diminishes as the tinder ages in long term storage over a period of years. With the exception of the need to be stored in an airtight package, it is superb tinder, easy to use with a high flame and long lasting.

Conclusions

Spark-Lite (left) - BlastMatch (right)This is a classic case of two products with a common purpose whose basic design, and the philosophy behind them, lends them to slightly different uses and markets. Both are excellent fire starters, neither is perfect. The ideal single-handed fire starter would be the size of the Spark-Lite with the spark producing capability of the BlastMatch. We're not going to hold our breath.
The experienced outdoors person will not have any trouble operating either fire starter. We like the better instructions included with the Spark-Lite, which would be a boon to the inexperienced, though as noted, there is room for improvement. Anyone who would need the instructions for either of these fire starters will likely need all the help they can get. Illustrations accompanying any textual instructions are always an advantage for the novice.
The instructions provided with the BlastMatch are barely adequate and in need of much improvement, both with regards to legibility and content. While there is no way to package the instructions within the BlastMatch itself, they could at least do a much better job with the ones provided. In a survival kit they could be attached to the body with tape or rubber bands, or the BlastMatch left packaged in its box with the instruction sheet.
Comparing the tinders, the WetFire is, by a significant margin, the most effective, but the Fire-Tab is no slouch, being perfectly adequate in our experience. Obviously, the packaging and storage requirements of the WetFire come into play in some circumstances, whereas the Fire-Tab is more accommodating of storage, both in terms of space and abuse. Of course, the Fire-Tab comes with the Spark-Lite and stores in the small case while the WetFire must be purchased and stored/carried separately, a potential drawback from a personal carry standpoint. The Fire-Tab also holds the edge in price at about one third the cost, though the WetFire isn't likely to bankrupt anyone ($2.50 vs $6). Again, like the fire starters themselves, two good products performing the same function, but fulfilling slightly different needs.
The Spark-Lite is very small and very lightweight and a complete one-handed fire starting kit, including tinder, in one small package. Individually, the Spark-Lite and tinder can be packaged into other small packages, such as a personal pocket-size survival kit, providing maximum capability in minimum space and weight. If minimum size or weight is a concern for you, this is your choice. Its disadvantage is that is requires a bit more care and finesse if you should happen to run out of prepared tinder or don't have any, in an effort to make do with the bare minimum, just the Spark-Lite itself.
The BlastMatch is, simply put, a more effective fire starter for general purpose use. It is somewhat bulky and heavy, which is a disadvantage for some. On the other hand, for many it doesn't matter and the massive sparking capability of the BlastMatch might be a real advantage in some circumstances. It certainly requires less finesse to use with natural or found tinder simply because it generates such a tremendous avalanche of sparks. It is hard to imagine the sort of feeble capabilities that a person would have to possess (though such people no doubt exist) to not be able to get a fire started using the BlastMatch.
Finally, we come to the matter of value. For only $6 to $7, the Spark-Lite kit is a bargain. The BlastMatch, at $20 with no tinder, is hardly that sort of bargain, but it isn't expensive and provides decent value for what you get, if it suits your purposes. Compared to the cost of a simple bar of 1/2 inch diameter man-made flint, the added functionality is well worth it.
The bottom line is that both the Spark-Lite and BlastMatch work quite well and do exactly what they are designed to do. Both are well made and that's a welcome feature when considering survival equipment upon which your life may someday depend. All you have to do is pick the one that best suits your needs and requirements.

Another One-Handed Fire Starter

Ranger Rick's "Dog Tag Fire Starter" (left) is another one-handed fire starter introduced in 2002. It is similar in concept to the Spark-Lite. It is a bit more compact in some respects and was originally designed to be worn on a necklace. It also requires some minor assembly before it's ready for use.
Click here for an expanded evaluation of Ranger Rick's Dog Tag Fire Starter
I HAVE USED ALL of the above.

Including a plain/bare ferrocerium rod.
But my 
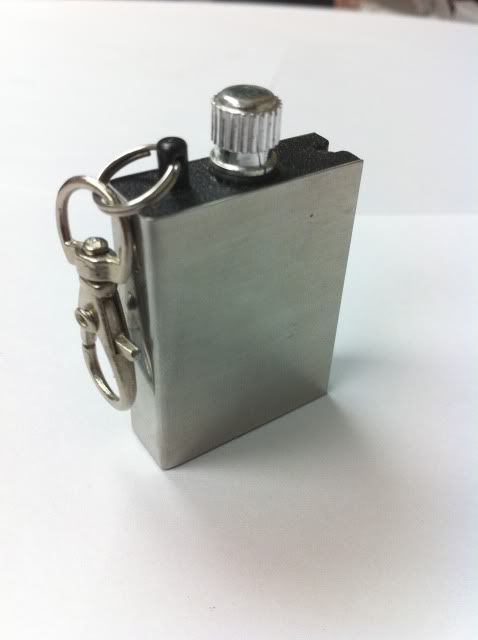
ALLTIME FAVORITE is the METAL MATCH a.k.a. PERMANENT MATCH. It is inexpensive and small enough for your keychain or to include in a ALTOID survival kit. there are many diferent ones. some round, some rectangular. My preference is rectangular because it fits nicely in an ALTOIDS CAN. Metal matches are fuel resevoirs that contain a small wand shaped sheathed wick, which sscrews insdie of the fuel resevoir. there is a ferrocerium rod attached to the edge of the resevoir. to light you remove the candle and strike it's metal tip on the rod. the sparks created light the candled wick.
when you initially fill one, give the first load a few seconds to be absorbed. put the candled wick in the fuel for a couple seconds then top off the resevoir. they can usse ANY IMFLAMMABLE LIQUID. they work great on gasoline. They light thousands of time on one filling.
TIP: when holding the resevoir while striking. HOLD FINGER OVER HOLE and hold it hole UP.. this helps conserve fuel as well as eliminate any likelyhood of accidently setting fire to the resevoir.

They are inexpensive costing about $5 ea. but sell for $1 ea. wholesale 10 unitss or more.
 Other firestarters make Sparks. This one MAKES FIRE!


here is  how to use a metal match. 

Survival stave

probably the FIRST THING you will want to make is in a classs all by itself. FEW "experts" even mention it. it is the STAVE. not only can it be used as depicted but also as a shooting monopod, shaft for spear or GIG but as a self-defence weapon as well. they make modern ones that collapse down to the size of a swagger stick/baton.


WATER

 you can live a long time without food. but not long without water.
before the advent of gadgetry the way we did it was this. we'd simply
filter the water through out Tee shirt. if we were near sand we'd
use sand too. then we'd hard boil it for at least three minutes and
then drop in a few coals from the fire to bring back the taste.
heres some tips.. a SPONGE is a great device to collect water with.
have one in your bag.
you can BOIL water in a PLASTIC CONTAINER as long as you don't let it sit
directly on the coals. the water dissipates the heat so the plastic
doesn't melt. you don't have to boil the water. low grade heat for a
longer time works. ez to do with solar.
 carry a SHEET OF CLEAR plastic. it has many uses. you
can use it to make a solar collector to steralize water. you can dig
a hole and put a cup etc. in the middle of it and cover the hole
with the plastic. put a stone in the middle on top and seal the
edges with soil. the water in the earth will heat up and distill on
the undersideof the plastic and drip into the cup. if you have a
supply of water ( even saltwater) you can re-plenish the earths
water by pouring some into the hole ocassionally. you can also use
the plastic sheet to collect rainwater by doing the same thing but
punch a small hole where the stone comes to a rest in the center of
the plastic so the rainwater drips into the cup or canteen or
whatever. next we cover DEVICES for water acquisition.

i use COLLOIDAL SILVER as a dis-infectant. and don't forget just AERATING the water helps to kill bacteria too. just shake h..l out of it. and for longer term/stationary waterfiltration consider this
http://www.potpaz.org/pfpfilters.htm
i have never owned one but have seen them milsurp but some armies ( canadian i think?) used a water filter BAG that was simply dense weave cotton denim, sewn into a long bag. they filled it with water, added dis-infectant and hung it up. the bottom end was sewn at an downward angle and cut so that the filtered water would drip from the corner. they filled it with water and hung it up with a catchment container under it. put more likely everyone would just hold thier canteen under the stream of water. MAKE YOUR OWN. it's simply a blue jean leg open on one end, sewn at a downward angle at bottom, cut off the angle. put in a paracord cinch at the top. supply several people with filtered water. costs negligable, rolls up fits in pack.
then theres the $2 water filters at wallyworld. they are like two 2gal plastic milkjugs one atop the other with a activated charcoal filter element between them. pour unfiltered water in and get filtered water out the faucet in the bottom of the lower one.
while this will do a good job of filtering the water and you can add dis-infectant after, the filter elemnt won't last long if you filter dirty water with it. theres a better way to utilize this device. whats good about the charcoal element is that it restores the flavor to water. so i have used them like this.... filter water first. pastuerize next. and pour the result through the charcoal last adding dis-infectant as a precaution.
they make floaters for spas that use SILVER and COPPER bb's in an depletable elemnt to dis-infect the water. i put a couple silver bb's in each of my canteen/water carriers. even in storage. just for safe measure. i also have a small homemade solar colloidal silver generator that i carry in my pack.
i use re-cycled dis-posable aluminized plastic bladders like commonly
found in BOXED WINE etc. they are suprisingly rugged ( you can cut one
but it's difficult to tear one) are insulated and have a little faucet
at the bottom. they fold up small. i stash them EVERYWHERE.in all my
vehicles, coats packs etc. to carry them i use blue lean legs sewn at
the bottom as already posted. with the bladder of filtered water
stored in the wet denim bag it acts like a COOLER to boot.

ps. the water will smell/taste like wine for a loooong time :).

What Gun?


The second question asked is,  if you are gonna have just ONE GUN what would it be? the answer is a .22/.410 over under gun. we're not talking about a gun to fight off the evil empire or zombies. we're talking about a breakdown backpackable gun capable of getting all game from squirrels/rabbits to ducks on the wing to deer out to 150 yards as well as defend against a grizz in grizz country. this was one of the first survival rifles issued to aircrews in ww2 in the form of the STEVENS model 24 or was it the SAVAGE 22/410. i forget which. but in either case neither are made any longer. more recently the SPRINGFIELD M6 has been issued but it is not nearly as functional as the others. it is no longer made either. however all can still be had used.from  http://www.oldjimbo.com/survival/v-shrake/m6.html
the only gun i know of that is still made is the BAIKAL ( russian made)SPARTAN which was marketed bt EAA for awhile and can still be bought new from BAIKAL. it has one advantage over the others in that it has a scope mount mounted. from http://www.gunsandammomag.com/long_guns/eaa_031105/
BAIKAL still sells them.

the IDEAL would be a .22/.410/.45LC you can shoot .45LC in a .410 but the barrel is smoothbore. only one gun i know of had the .22/.410 with a rifled barrel to shoot .45LC. i think it was made by Cobray who used to not only sell it but kits as well. it had a fold up stock. it's no longer made either. but exactly the same guns were made  by FMJ. but  they went out of business in 1996. i can't find any photos of the long barrel O/U
 so for now the only gun available is the BAIKAL SPARTAN. if anyone knows of a .22/.410/.45LC please advise. the nearest contender is the H&R FIREARMS "SURVIVOR"

Survivor® | .410/45 Colt


ModelSurvivor®
Ammo.410/45 Colt (Blued-SB1-41C and Nickel-SB1-41N)
StockHigh-density polymer, black matte finish, thumbhole design, butt stock storage compartment, sling swivel studs and sling.
Barrel20"
ChamberUp to 3"


no .22 though. i have repeatedly suggested they make a survivor with .22lr/.22wmr over .410/.45LC. now THAT would be a REAL SURVIVOR! if you'd like to write the design team suggesting this product heres thier email. BOB's addy
rchipman@hr1871.com

AIRGUNS

most shooters started out with airguns. while a great trainer they are also good for hunting. even the cheap $20 adult airgun will hunt small game. especially squirells since they are usually up a tree and at short range.  my cheapo single pump will shoot through a piece of 3/8 plywood at 50 ft. but if you want more theres this .50 caliber airgun. not to bet denegrated, there are airguns that rival firearmss in capabilities. Lewis and Clark carried two that would sshoot 20 shots at full power on one filling. they killed everything, even buffalo, with them. they impresssed the indians so much that they were afraid to mess with the expedition.
 Airguns of this caliber are still made but are expensive relative to firearms.
heres a little known ( i discovered it and tested it independently)
trick.
if you're shooting .22 pellets you can double the capabilities of it
by putting a DROP OF DIESEL inside the pellet. turns it into a mini-
rocket. sounds like a .22 short. hasn't harmed my $20 norinco single
pump air rifle.
you can also put a strike anywhere match head in the pellet (
instead of diesel) and it will make it an contact exploding pellet.
no big deal. just like a snapcap. but you can see where the pellet
hits at long distance. just for fun.

BLADES

First things first MACHETE

every discussion about survival begins with the indespensable survival item the BLADE. not only that but the subject usually results in heated discussion.
if you are putting together your first survival kit the first blade you want is a MACHETE. this is the most versatile blade available. you can imagine that as the bladerunner i have an extensive blade collection. including at least five different patterns of machete. living the survivalist lifestyle for many years i have had the opportunity to use many of them. the one that has gotten the most use is my african pattern machete. but lets not take just my opinion for it. lets look at others.
the pre-emminent survivors are the indigenous peoples of the world. from the tribes of the south pacific to the tribes of the amazon to the tribes of africa they all have ONE BLADE IN COMMON..... THE MACHETE. pay attention to the TV programs like tribal life or the pbs programs or the travel logs etc. about these primitive stone age peoples. they survive day in and day out sometimes naked..... but ALL carry MACHETES.
it's small enough to process food, cut veggies, wack melons and coconuts etc. large enough for hunting and butchering, killing wild pigs with one stroke, cutting off a snakes head safely etc. as well as cutting down trees, brush or bamboo for shelter and CARVING wood implements such as bows/arrows, wood bowls, bamboo water carriers,even canoes/rafts  etc. and can be used as a shovel. plus it makes a formidable weapon to boot. not only all that but they are usually made of soft steel so they can be sharpened with a rock. or as i once saw a ubangi do it with sand on a log. NO OTHER BLADE can do ALL these things. THATS WHY it's the preferred blade of true survivalists. i can also throw in the preferences of the worlds MILITARIES.  MAKE YOUR FIRST BLADE A MACHETE!
WHICH PATTERN? i've found the african pattern suitable. but the LONGER the blade and the HEAVIER the blade the BETTER. even machetes with the end wider that the rest will do. the idea is INERTIA CUTS.
i once posted this on one of the phony ass survival groups. the so-called EXPERTS took issue with me. they allowed as how they took kids out on weekend survival hikes they knew best and they liked thier six inch fixed bladed BLaBLA knife ( insert boutique, name brand, expensive bragging knife) and besides they preferred to push the brush aside rather than cut it. frikken asshole thought thats all a machetes for. but hey... they are EXPERTS!
you don't have to spend a fortune on your first blade either. i paid $5 for my favorite one. if you can't find a brazillian or chinese made one cheaply theres ones like COLD STEEL which are very high quality and reasonable price
http://www.eknifeworks.com/webapp/eCommerce/prodlist.jsp?Mode=Text&Brand=&CatalogName=&PriceStart=&PriceEnd=&Feature=&SearchText=machete&list=50&range=1&order=Default
what i call african pattern they call the panga, which is my favorite
http://www.eknifeworks.com/webapp/eCommerce/product.jsp?Mode=Text&Brand=&CatalogName=&PriceStart=&PriceEnd=&Feature=&SearchText=machete&list=50&range=1&order=Default&SKU=CS97PM
 i also have latin pattern ( blade too long and thin and lightweight. flexes and has little heavy chopping factor)
http://www.eknifeworks.com/webapp/eCommerce/product.jsp?Mode=Text&Brand=&CatalogName=&PriceStart=&PriceEnd=&Feature=&SearchText=machete&list=50&range=1&order=Default&SKU=CS97AM24
 the BOLO pattern ( good but too short)
http://www.eknifeworks.com/webapp/eCommerce/product.jsp?Mode=Text&Brand=&CatalogName=&PriceStart=&PriceEnd=&Feature=&SearchText=machete&list=50&range=1&order=Default&SKU=CS97BM
 thier HEAVY MACHETE looks like it would be good but i never tried one.
http://www.eknifeworks.com/webapp/eCommerce/product.jsp?Mode=Text&Brand=&CatalogName=&PriceStart=&PriceEnd=&Feature=&SearchText=machete&list=50&range=1&order=Default&SKU=CS97HM
 the TRAMONTINO line looks good too. it's more akin to the brazillian machetes i have. especially the cane machete which looks like it would function as a good shovel too.
http://www.eknifeworks.com/webapp/eCommerce/product.jsp?PriceEnd=&order=Default&CatalogName=&range=51&list=50&Feature=&SearchText=machete&Mode=Text&Brand=&PriceStart=&SKU=TR2620

IMHO the ultimate in machetes is the RUSSIAN military issue. It's a purpose designed machete whic is HOLLOW HANDLE to hold a survival kit.
possibly the ultimate in survival machetes. the SPETZNATZ tool. although i would have made the blade six inches longer it is probably the best ONE BLADE MADE. they ain't cheap though. will cost you way over a hundred bucks if you can find one.


whatever machete you opt for DO NOT buy the u.s. issue camillus machete. it's a piece of CRAP!

Second blade AX/Tomahawk/hatchet

the one blade discussion is mostly academic. because most everyone will have more than one blade. in that case the 2nd blade is second to the third blade. so to speak.
if we look at those same indigenous peoples we find thier second blade is an axe. for the american indians it was a tomahawk. i keep my tomahawk in my carpenters toolbox. i keep it sharp as a razor.... literaly. i don't WHACK with it i CARVE with it. it's ground like a chisel. i use it a lot for timber framing. but when it comes time to butcher a deer it's the tomahawk that surpasses everything else. over the years i have tried every knife and combination of knives available to dress deer. NOTHING works as well as the tomahawk. and it does it all ALONE. i use nothing else but it to completely dress out a deer. from slitting to cutting steaks. all done with EASE.the head slips off the handle and can be used like the eskimo ulu. but it has no provision for hammering. there are viking designed axes that are like tomahawks with a hammerhead. but i've never owned one.
 for general camping use i prefer a long handle camp axe. a hatchet is a compromise. it's not big/long/heavy enough to do many jobs with ease. it can do them but not with ease. my favorite camp axe is the ESTWING. the handles are literaly indestructible. i have a couple estwing hammers that i've used for over 20 years. most building. i routinely use the handles as splitting wedges without harm. i keep my estwing axe in my vehicle. the ESTWING FIRESIDE looks like a great compromise. nothing beats a splitting maul head for cutting wood and the heavy head is also a great maul. compactness too. if i ever build another timber frame i'll definitely get one of these. two tools in one hand will simplify my work.

 Third blade: Fixed blade knife

this is where things get sticky. when most people ask about what
blade they really mean what knife. my first knife,when i was a
preteen was my fathers KABAR which he carried through WW2. although
KABAR is a brand name it has also come to be a generic term.
although KABAR made MOST of the issue knives in WW2 CAMILLIUS also
made them to the government specs too. while KABAR still makes
knives the latest one are nothing like the original spec. the blades
are much smaller/thinner and have powder coated epoxy finish. on the
other hand CAMILLUS still makes the current military issue knife to
the original specs. same size and PARKERIZED finish.
the bowie design has been the hands down favorite design ever since
it's origin. i have numerous ones. but there are a couple others
worthy of mention. one is the u.s. issue aircrew survival knife.
it's a modified bowie with parkerized finish, sawblade back, sheath
holds a whetstone,bolster hole for fastening it to a staff as a
spear. it's made to the same construction methods as the
issue "kabar". laminated leather handle etc. both are favorites of
mine. but the knife that is attached to my bugout gear is a u.s.
issue BAYONET. i have a few. one for the m-16 one for m1 carbine but
the one i like best is the one for the m1 garand. i have a shortened
one made by s.korea who shortened the issue long ones we gave them
and refurbished them so they would fit in a m-16 bayonet sheath. i
like it's parkerized finish and the fact that the sheaths are SELF-
SHARPENING sheaths. it sharpens the blade everytime you withdraw it.
when you use it a lot all you have to do is pump the knife in and
out of the sheath rapidly a few times to sharpen the blade. i also
favor the m1 over the m16 because of the large hole in the bolster
that fitts over the barrel. it makes it very easy to mount on a
staff to make a spear.
many "survivalists" insist that you have to pay a lot of money for a
fancy wierd shaped knife to get a good survival knife. it ain't so.
the "designer" blades are just GIMMICKS! they have to come up with
something UNIQUE in order to have something to market. after all how
can they compete otherwise. as for quality you can't get any higher
quality than MILSURP. who has more money to pay for quality than the
military. and what designs have been more tested/proven?

Fourth blade: Multi-tool

now the choices really get prolific. for 20 years i carried a swiss
army knife on my belt. as an electrician/builder i literally wore out
the screwdriver and saw blades. so i relagated it to pocketknife (5th
blade) status and got a leatherman.i won't expound on the virtues of
these two as they are well known. but when KERSHAW came out with thier
multi-tool, the first to have locking pliers ( needlenose) i just had
to have one. i only carried it for awhile because soon afterwards
leatherman came out with the CRUNCH. it's a working persons dream
knife. especially if they are an electrician. it has ONLY a
electrician blade, phillips, three flatheads, a file ( perfect for
cleaning electrical contacts) a pair of locking vise grips and a HEX
BIT driver.with a ruler etched on it's side and a bottle opener notch
in frame thrown in. everything you could want in a portable working
multi-tool WITHOUT all the other nonsense. i have carried it and used
it daily since. it has saved me many hours trekking to the toolbox.
but i wouldn't call it a survival knife.

Fifth Blade Pocket knife

now the choices are waaaay to numerous to cover. so i'll just say that
i carry the swiss army knife as a pocket knife now. after all it is
small enough and smooth enough to rank as such. but i also carry a
conventional pocket for sentimental reasons. even though i do use it
often. it's pointed blade is good for digging out splinters ( unlike
any of the previously mentioned blades) and it's flat end blade is
great for sheet cutting like a sheetrock knife. i prefer a 6 inch
three blade stockman. .everyone makes good ones.

Sixth blade: Shovel

Most people forget about this 6th blade. but it is very importatnt. it allows you to dig without using your other blades. some even have a cutting edge on one side so it can be used like a machete. some have a sawblade on one edge too. milsurp is best for shovel. no one else makes them as well.

Seventh blade: SAW

There are many different saw available. some machetes have a sawback. many of them are for looks only. you can tell the difference by looking at the saw teeth. a real saw teeth will be OFFSET like a real saw. Not many machetes have a real sawback.
you can also get folding saws. make sure you get one with multiple blades for wood, ceramic, metal etc.

Sharpening trick : I'll not expound on sharpening techniquess. there are many books devoted to the subject. but I do want to tell you a trick. you can sharpen blades using the UNGLAZED bottom of ceramic cups/dishes/pots.


Introduction

welcome to the survivorlist group.
my wife and i have been living the survivalist lifestyle since 1977
when we dropped out of the city to live in the quachita national
forest. where we had a 13 acre truck garden. it was more than a
truck garden in name only. we didn't have a tractor so we pulled a
six bottom plow around the pasture with our old pickup truck LOL. we
grew an enormous amount of food. we did that a couple years before
moving to the ozarks of N.W. arkansas in 1979. i was a building
contractor for several years doing mostly victorian preservation.
but have also done alternative building too. i have been
incorporated as alternative energy systems inc. since 1979 and was
one of the early solar advocates. i have written seven how-to books.
one on converting wankel engines to aircraft use and six called the
TUNDRA DAISY COOKBOOKS of how-to make back to basics devices from 55
gallon oildrums. i am a licensed electrician, radio operator and
pilot and certified welder. before dropping out i was a hardhat
diver and shipfitter. i also raced stockcars, motorcycles and built
homebuilt aircraft. in eureka springs i had a knife business
called the bladerunner, which is my radio call, and used to make
knives on my lunch hour when i was a shipfitter. i have been a
shooter all my life having gotten my first rifle at age 9. i was
raised in the swamps of louisiana and by age 10 was going out for
weekends in the swamp alone or with friends.things were different
then. it was normal for young teens to go out "camping/hunting in
the wilds with little more than a knife and gun ( i've never owned a
tent to this day) for the weekend. i build guns as an amatuer
gunsmith ( amatuer means i don't get paid :)) ) specializing in long
range precision shooting irons and tactical rifles. we still live a
simple life on the shores of beaver lake. i also convert schoolbuses
to class A motorhomes called SKOOLIES. i build them, as well as my
cabins, SINGLEHANDEDLY....i also have a retreat we call moark where
i'm building a survival shelter from a over road refrigerator box.
commonly called a reefer. heres my hobby webpage about it.
http://beaverlake.homestead.com/moark.html .